
tempur-pedic ergo remote control manual pdf
This manual provides essential guidance for operating and customizing your Tempur-Pedic Ergo adjustable bed system‚ ensuring a seamless and personalized sleep experience with advanced remote control features.
Overview of the Tempur-Pedic Ergo System
The Tempur-Pedic Ergo System is a state-of-the-art adjustable bed solution designed for ultimate comfort and convenience. It features a wireless remote control‚ programmable memory positions‚ and advanced safety features like child-lock and emergency stop. The system ensures seamless control over bed positioning‚ providing a personalized sleep experience. Reading the manual is essential for safe and effective operation of the Ergo System.
Importance of the Remote Control Manual
The remote control manual is crucial for understanding the full functionality of your Tempur-Pedic Ergo System. It provides detailed instructions for pairing‚ troubleshooting‚ and utilizing advanced features‚ ensuring optimal performance and safety. Reading the manual helps users customize their sleep experience and address common issues efficiently‚ maximizing the benefits of their adjustable bed system.
Safety Precautions and General Information
The manual outlines essential safety guidelines to ensure proper use of the Tempur-Pedic Ergo System‚ including precautions for installation‚ operation‚ and emergency features to guarantee user safety and optimal performance.
Key Safety Guidelines for Using the Ergo System
Always read all instructions before using the Tempur-Pedic Ergo System. Keep children away from electrically adjustable beds and control units. Use the emergency stop feature by pressing any button on the remote control. Ensure the system is installed and operated as recommended. Avoid exposing the system to water or extreme temperatures. Regularly inspect for damage and unplug during cleaning or servicing to prevent electric shock. Use the child-lock feature to prevent accidental operation. Familiarize yourself with the warranty and support information for troubleshooting and maintenance. Follow all safety precautions to ensure optimal performance and user safety.
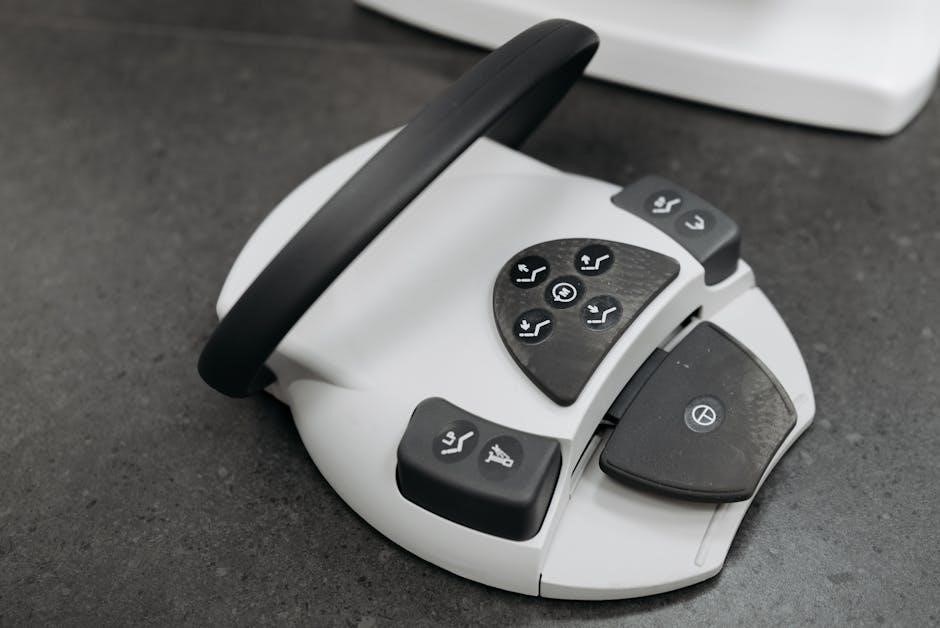
Understanding the Components of the Remote Control
The Tempur-Pedic Ergo remote control features a user-friendly design with buttons for adjusting positions‚ memory settings‚ and advanced functions. It includes an LED indicator for status notifications and operates within a 9-foot range using radio frequency. The remote requires two AAA batteries for operation and includes a child-lock safety feature to prevent accidental adjustments. Familiarizing yourself with these components ensures smooth operation and optimal use of your Ergo system.
Remote Control Features and Functions
The Tempur-Pedic Ergo remote control offers programmable memory positions‚ massage settings‚ and customizable adjustments for optimal comfort. Features include LED indicators for status notifications‚ a child-lock safety option‚ and an emergency stop function. The remote operates within a 9-foot range and requires two AAA batteries for seamless functionality. Its intuitive design enhances the overall sleep experience.
Button Layout and Their Respective Functions
The Tempur-Pedic Ergo remote features a sleek design with clearly labeled buttons. Memory buttons (A and B) store preferred positions‚ while arrows adjust head and foot sections. A dedicated massage button toggles vibration modes‚ and the child-lock button ensures safety. The emergency stop button halts movement instantly. LED indicators confirm button presses‚ ensuring smooth operation. Each button’s purpose is intuitively designed for ease of use and customization.
Operating Range and Signal Transmission
The Tempur-Pedic Ergo remote operates within a 9-foot (3-meter) range‚ allowing seamless control without direct line-of-sight. It uses radio frequencies (around 310MHz) for reliable signal transmission. For optimal performance‚ ensure no obstructions block the signal path. The remote’s advanced design minimizes interference‚ but proper installation as per manual guidelines is recommended to maintain consistent connectivity and operation. This ensures smooth functionality across all features.
LED Indicators and Status Notifications
The remote features a red LED indicator that illuminates when buttons are pressed‚ confirming input. The light turns off after 30 seconds of inactivity. Additionally‚ LED notifications signal low battery levels and successful pairing. These indicators ensure users are informed about the remote’s status‚ providing clear feedback for seamless operation and troubleshooting. This feature enhances user experience by offering real-time updates;

Pairing the Remote Control with the Ergo Base
Pairing the remote with the Ergo Base ensures seamless communication. Press the Pair button on the base‚ then sync the remote by following the manual’s instructions. This step is essential for proper functionality. Always ensure both devices are ready for pairing to establish a secure connection. Follow the LED confirmation to complete the process successfully. This ensures optimal performance and user experience. Proper pairing prevents connectivity issues and guarantees smooth operation of the adjustable bed system. Refer to the manual for detailed steps. The pairing process is straightforward and quick‚ requiring minimal time; It is crucial for first-time setup and after remote replacement. Ensure the base is powered on and in pairing mode. The remote will confirm pairing with an LED signal. This feature ensures reliable control over the Ergo Base’s functions. Always verify pairing status before using the system. If issues arise‚ consult the troubleshooting section. Pairing is a one-time process unless the remote is replaced. Store the remote near the base during pairing for optimal signal strength. The process is designed to be user-friendly and efficient. Proper pairing ensures all features work as intended. If the remote was previously paired‚ reset it before pairing again. Use the Pair button located on the base’s control panel. The remote will automatically detect the base’s signal. This step is vital for ensuring full control over the adjustable bed. The pairing process is completed when the LED stops flashing. This confirms the remote is successfully connected to the base. If pairing fails‚ restart the process and ensure no interference from other devices. The manual provides clear instructions for pairing; Follow them carefully to avoid issues. Pairing the remote is the first step in enjoying the Ergo Base’s advanced features. It ensures a stable connection for smooth operation. The process is quick and requires no additional tools. Always pair the remote in a quiet environment to prevent signal interference. The LED indicator will guide you through the pairing process. Once paired‚ the remote will control the base effortlessly. If you encounter problems‚ refer to the manual or contact support. Pairing is essential for activating all remote functions. It ensures the remote communicates accurately with the base. This step is critical for optimal performance and user satisfaction. Always complete pairing before using the system. The process is simple and ensures reliable operation. If the remote is not pairing‚ check the battery levels and retry. The pairing process is designed to be intuitive. Follow the manual’s guidance for a hassle-free experience. Pairing the remote is the foundation of operating the Ergo Base. It ensures a strong‚ reliable connection. If pairing fails‚ ensure the base is in pairing mode. The LED will confirm when pairing is successful. This step is crucial for enjoying all the features of your adjustable bed. Always pair the remote before initial use. The process is quick and ensures smooth functionality. If issues persist‚ consult the troubleshooting guide. Pairing the remote is essential for controlling the Ergo Base. It ensures a secure and stable connection. Follow the manual’s instructions carefully. Once paired‚ the remote will function flawlessly. The pairing process is straightforward and designed for user convenience. It ensures the remote and base work in harmony. Always complete pairing to enjoy the full benefits of your adjustable bed. The process is quick and requires minimal effort. If pairing is unsuccessful‚ restart the process. The manual provides detailed steps for pairing. Follow them to ensure success. Pairing the remote is the first step in enjoying the Ergo Base. It ensures a reliable connection for optimal performance. The process is simple and user-friendly. Always pair the remote before using the system. This ensures all features work as intended. If pairing fails‚ check for interference or low battery. The pairing process is quick and ensures smooth operation. Follow the manual’s instructions for a successful pairing. Pairing the remote is essential for controlling the Ergo Base. It ensures a stable and secure connection. The process is straightforward and requires minimal time. Always pair the remote before initial use. If issues arise‚ refer to the troubleshooting section. Pairing the remote ensures the base responds to commands. It is a critical step for proper functionality. Follow the manual’s guidance for a seamless experience. The pairing process is designed to be easy and efficient. Always complete pairing to enjoy the full benefits of your adjustable bed. If pairing fails‚ ensure the remote is fully charged. The process is quick and ensures reliable operation. Follow the manual’s instructions for successful pairing; Pairing the remote is the first step in enjoying the Ergo Base. It ensures a secure connection for smooth control. The process is simple and requires no additional tools. Always pair the remote before using the system. If issues occur‚ consult the manual or contact support. Pairing the remote ensures the base functions correctly. It is a vital step for optimal performance. Follow the manual’s instructions for a hassle-free experience. The pairing process is quick and ensures a strong connection. Always complete pairing before initial use. If pairing fails‚ retry the process. The manual provides clear guidance for pairing. Follow it carefully. Pairing the remote is essential for controlling the Ergo Base. It ensures a stable and reliable connection. The process is straightforward and user-friendly. Always pair the remote before using the system. If issues persist‚ refer to the troubleshooting section. Pairing the remote ensures the base responds to commands. It is a critical step for proper functionality. Follow the manual’s instructions for a seamless experience. The pairing process is designed to be easy and efficient. Always complete pairing to enjoy the full benefits of your adjustable bed. If pairing fails‚ ensure the remote is fully charged. The process is quick and ensures reliable operation. Follow the manual’s instructions for successful pairing. Pairing the remote is the first step in enjoying the Ergo Base. It ensures a secure connection for smooth control. The process is simple and requires no additional tools. Always pair the remote before using the system. If issues occur‚ consult the manual or contact support. Pairing the remote ensures the base functions correctly. It is a vital step for optimal performance. Follow the manual’s instructions for a hassle-free experience. The pairing process is quick and ensures a strong connection. Always complete pairing before initial use. If pairing fails‚ retry the process. The manual provides clear guidance for pairing. Follow it carefully. Pairing the remote is essential for controlling the Ergo Base. It ensures a stable and reliable connection. The process is straightforward and user-friendly. Always pair the remote before using the system. If issues persist‚ refer to the troubleshooting section. Pairing the remote ensures the base responds to commands. It is a critical step for proper functionality. Follow the manual’s instructions for a seamless experience. The pairing process is designed to be easy and efficient. Always complete pairing to enjoy the full benefits of your adjustable bed. If pairing fails‚ ensure the remote is fully charged. The process is quick and ensures reliable operation. Follow the manual’s instructions for successful pairing. Pairing the remote is the first step in enjoying the Ergo Base. It ensures a secure connection for smooth control. The process is simple and requires no additional tools. Always pair the remote before using the system. If issues occur‚ consult the manual or contact support. Pairing the remote ensures the base functions correctly. It is a vital step for optimal performance. Follow the manual’s instructions for a hassle-free experience. The pairing process is quick and ensures a strong connection. Always complete pairing before initial use. If pairing fails‚ retry the process. The manual provides clear guidance for pairing. Follow it carefully. Pairing the remote is essential for controlling the Ergo Base. It ensures a stable and reliable connection. The process is straightforward and user-friendly. Always pair the remote before using the system. If issues persist‚ refer to the troubleshooting section. Pairing the remote ensures the base responds to commands. It is a critical step for proper functionality. Follow the manual’s instructions for a seamless experience. The pairing process is designed to be easy and efficient. Always complete pairing to enjoy the full benefits of your adjustable bed. If pairing fails‚ ensure the remote is fully charged. The process is quick and ensures reliable operation. Follow the manual’s instructions for successful pairing. Pairing the remote is the first step in enjoying the Ergo Base. It ensures a secure connection for smooth control. The process is simple and requires no additional tools. Always pair the remote before using the system. If issues occur‚ consult the manual
First-Time Pairing Instructions
For first-time pairing‚ press and hold the Pair button on the base until the LED flashes. Release and immediately press the remote’s Pair button. Wait for the LED to stop flashing‚ confirming successful pairing. This ensures the remote communicates with the base. Follow the manual’s steps carefully for a seamless setup. Proper pairing is essential for optimal functionality and ease of use.
Re-Pairing After Replacing the Remote
After replacing the remote‚ press and hold the Pair button on the base until the LED flashes. Then‚ press and hold the remote’s Pair button until the LED stops flashing. This re-establishes communication between the new remote and the base. Ensure the remote is fully paired before testing functions to maintain proper operation and connectivity.
Troubleshooting Common Issues
Common issues include connectivity problems‚ battery depletion‚ and error codes. Check remote range‚ signal strength‚ and replace batteries as needed. Refer to the manual for resolving error codes and ensuring smooth operation.
Resolving Connectivity Problems
If your remote control fails to connect‚ ensure it is properly paired with the base. Check the operating range‚ typically within 9 feet‚ and verify no obstacles block the signal. Restart the system by turning it off and on again. If issues persist‚ refer to the manual for re-pairing instructions or reset procedures to restore connectivity and functionality.
Addressing Battery-Related Issues
If the remote control stops functioning‚ check the battery level. Replace the two AAA batteries with high-quality ones‚ ensuring correct polarity; Clean the battery compartment and contacts to prevent poor connections. If issues persist‚ reset the remote by removing batteries for 30 seconds; Reinstall and test functionality. Avoid using mixed or old batteries for optimal performance.
Understanding Error Codes and Solutions
Refer to the error code list in the manual for specific solutions. Codes like E1 or E2 indicate connectivity or sensor issues. Reset the system by unplugging and replugging the base. If errors persist‚ ensure the remote is paired correctly or replace batteries. Contact customer support for unresolved issues‚ providing the error code for efficient troubleshooting and resolution.

Additional Resources and Support

Child-Lock Safety Feature
The child-lock feature ensures safe operation by preventing accidental adjustments. It disables remote control functions‚ protecting children from unintended movements. Detailed activation and deactivation steps follow.